


Lace Knitting from a Chart with Kraemer Yarns
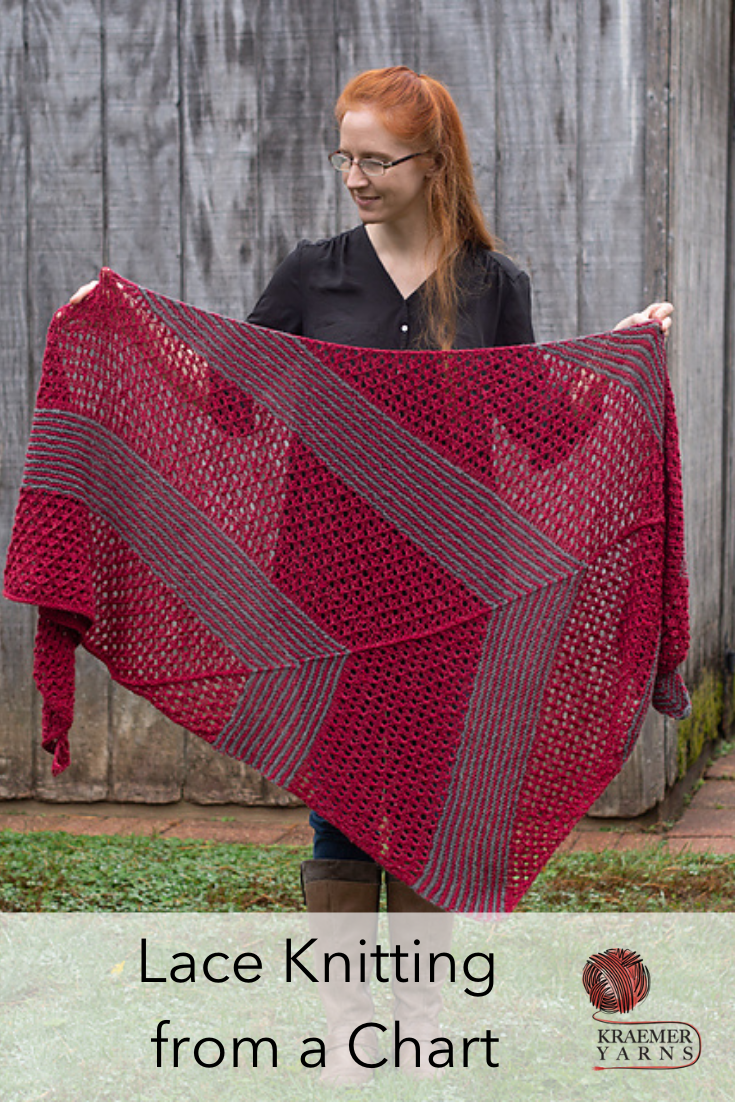
In knitting patterns, charts are used to visually represent the stitches for colorwork or lace patterning. The Chestnut Hill Shawl is a pattern that alternates sections of garter stitches stripes and lace. Today we’d like to give you some of our best tips and tricks for working the lace stitches from the charts.

READING THE CHART
What should you notice about the chart in your knitting pattern? Think of the chart as a road map for your knitting as it includes the stitches on each row, the type of each stitch, and any increases or decreases. Before you begin knitting you should take a look at the chart and take note of a few key points.
Chart Basics: Row Numbers & Key Legend
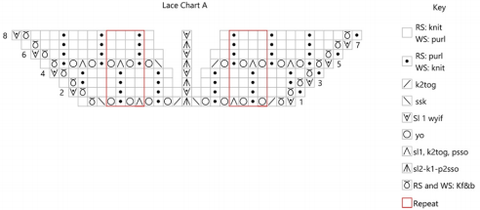
As right-handed knitters work their stitches from right to left, the start of your chart, Row 1, is located in the lower right of the chart. As the Chestnut Hill Shawl is worked flat, after your first row is completed, Row 2 begins on the left-edge of the chart.
Each box on the chart represents a stitch (or multiple stitches in the case of decreases). In the legend, you’ll see that an empty box represents a knit stitch on the right side and the box with a dot in the middle represents a purl stitch. The pattern key for the Chestnut Hill Shawl follows the Knit Chart Symbols of the Craft Yarn Council. Knitters that are comfortable in reading their stitches will recognize that the symbol represents a stitch as it looks on the right side of the work. The red rectangle outlines a set of stitches that compose stitch repeat. If you printed your pattern in black and white, this outline may not be apparent and we would strongly encourage you to indicate this on your chart with a marker or pen!
Extra notions
You may find it useful to have a few extra notions nearby when you begin working from a chart to help you keep your place. Highlighter tape, found at some LYSs and office supply stores, is repositionable and the right width for chartwork. Place it on the row you are working and your eye is easily drawn to the right spot. Sticky notes work in a similar fashion.

Highlighters, or colored pencils, allow you to designate each yarnover stitch orange, purls on the right side purple, the K2togs are pink while the SSKs are green. You could even do a combination if that works best for you! Knitter’s choice!

Knitting from a chart
In the photo below, we are ready to begin the first row of Lace Chart A. We have inserted a lifeline and have stitchmarkers at the ready. A lifeline is a piece of yarn or thread that runs through every stitch of one row. It's a preventive measure that keeps stitches safe in case you need to unravel your knitting later on for one reason or another. It is not required, but can ease some anxiety! Take care when you place the lifeline to avoid the stitchmarker! We already had the black stitch marker in place as instructed from the stripe section. We’re making sure any additional stitch markers are a different color to avoid confusion. The Chestnut Hill Shawl has the lace sections written out and charted. You can work from one or the other, or a combination to confirm you know what you should be doing with your stitches!
As we work through the first set of stitches, we will place the stitch markers before and after each pattern repeat. This is also not required, but oftentimes helps to keep track of the stitches. We have found that it is surprisingly easy to be distracted when counting when there are increases and decreases!

Remember, you are starting on the right-hand side of the chart. If we take it a few stitches at a time, Row 1, Lace Chart A, indicates:
- Sl 1 wyif, Kf&b, k2tog
- *yo, p1, yo, sl-1-k2tog-psso* (This is the part of the chart shown within the “pattern repeat” box, so we will add a stitch marker before the first yarnover of each repeat.) repeat to 5 sts before the marker
- Yo, p1, yo, ssk, sl 2-k1-p2sso, (you'll have to move and replace the center marker)
- K2tog, yo, p1, yo
- *sl1-k2togkpsso, yo, p1, yo* (This is the part of the chart shown within the “pattern repeat” box.) repeat to the last 4 sts
- Ssk, kf&b, k1
What does that look like on the needle? We’ve spread things out a bit to show you the pattern repeat:


Now we have a light break: Row 2 on the chart shows this is a row of only knits, purls, and a slip stitch. Reading across the chart, we’re instructed to work across the wrong side as follows:
- Sl 1 wyif, kf&b, p2
- *P1, k1, p2* (pattern repeat) until 3 sts before the marker
- P1, k1, p1, sm, sl 1 wyif, p1, k1, p1
- *p2, k1, p1* (pattern repeat) to the last 4 sts
- P2, kf&b, k1
From there on, you’ll continue to work the chart and pattern as instructed. When you reach Lace Chart C, you’ll notice it is similar to the previous charts! At this point you’ll be able to write out your own row-by-row instruction by reading the chart if you choose.
With practice, reading charts will become just as intuitive as reading the written instructions! A number of patterns include charts for lace work, colorwork, textured stitches like eyelets, and cables. Remember, just take it one stitch at a time!
Don’t forget to pin this post!
